


What’s Included & Why You’ll Love It
Canvas, diamonds, and tools – everything you need to get started.
Sparkling resin drills and a soft velvet canvas for a luxurious finish.
Original artwork you won’t find elsewhere.
Carefully designed for vivid colours, clarity, and stunning sparkle.
Choice of Canvas Size and Diamond Shape
Choice of Canvas Size
There are a variety of canvas sizes available, ranging from 30 × 30 cm up to 80 × 80 cm. Diamond art canvases are created by converting an image into thousands of coloured dots, meaning the final result is intentionally pixel-based and so will never look like a smooth drawing. While some fine detail is lost in this process, it is more than compensated for by the beautiful sparkle, depth of colour, and texture that make diamond painting so special.


Smaller canvases still produce a lovely, shimmering result, but details such as facial features, fur, or intricate patterns will appear softer and less defined. Larger canvases contain more diamonds, allowing the image to be represented with greater detail, smoother colour transitions, and clearer definition. The larger the canvas, the more “pixels” are used, which reduces colour blending artefacts and creates a more refined final artwork — this is why the same design can look quite different depending on the size chosen.
Compare the picture when it is undertaken as a 30 × 30 cm vs 40 × 40 cm vs 60 × 60 cm diamond art project. Where we feel a design is too detailed to have adequate representation at a smaller size, we intentionally do not offer that option to ensure a satisfying final result.
Larger canvases also provide a longer, more immersive diamond painting experience and tend to have greater visual impact when displayed. Other important considerations when choosing a canvas size include the time you would like to spend completing the artwork, the wall or display space available once finished, and the overall cost. Each design is offered in a carefully selected range of sizes so you can choose the option that best suits your preferences, space, and diamond-painting experience.
Size Suggestions:
30 × 30 cm – 30 × 40 cm | Small & Gift-Friendly
Best for quick projects, gifts, or limited wall space. These sizes still sparkle beautifully but have softer detail, making them ideal for simpler designs or for someone trying diamond painting for the first time.
40 × 40 cm – 40 × 50 cm – 50 × 60 cm | Most Popular / Balanced Choice
A great all-round option for most designs. These sizes offer noticeably better detail and smoother colour transitions while still being manageable in time, space, and cost. If you’re unsure which size to choose, this is usually the safest pick.
60 × 60 cm – 80 × 80 cm – 60 × 80 cm | Statement Pieces
Perfect for highly detailed artwork or when you want maximum impact. Larger canvases deliver the clearest detail, the smoothest colour blending, and a true “wow” factor once displayed. They take longer to complete but are incredibly rewarding and ideal as feature pieces for larger walls.
Beginners vs experienced painters
Beginners often enjoy starting with a smaller or mid-sized canvas to build confidence, while experienced diamond painters typically prefer larger sizes for the extra detail and immersive experience.
Choice of Diamond Shape
Diamonds (aka drills) come in two shapes — round or square — each offering a slightly different look and experience.
Square drills fit tightly together with no gaps, creating a crisp, mosaic-style finish with sharper detail and cleaner edges. They are ideal for highly detailed designs and are often preferred by experienced painters, though they require a bit more precision when placing.
Round drills are quicker and more forgiving to work with, making them a popular choice for beginners or relaxed projects. They still sparkle beautifully and give a slightly softer, more painterly appearance due to the small gaps between drills.
When choosing a diamond painting you can select either square or round drills based on your personal preference and the features of the design you have selected.
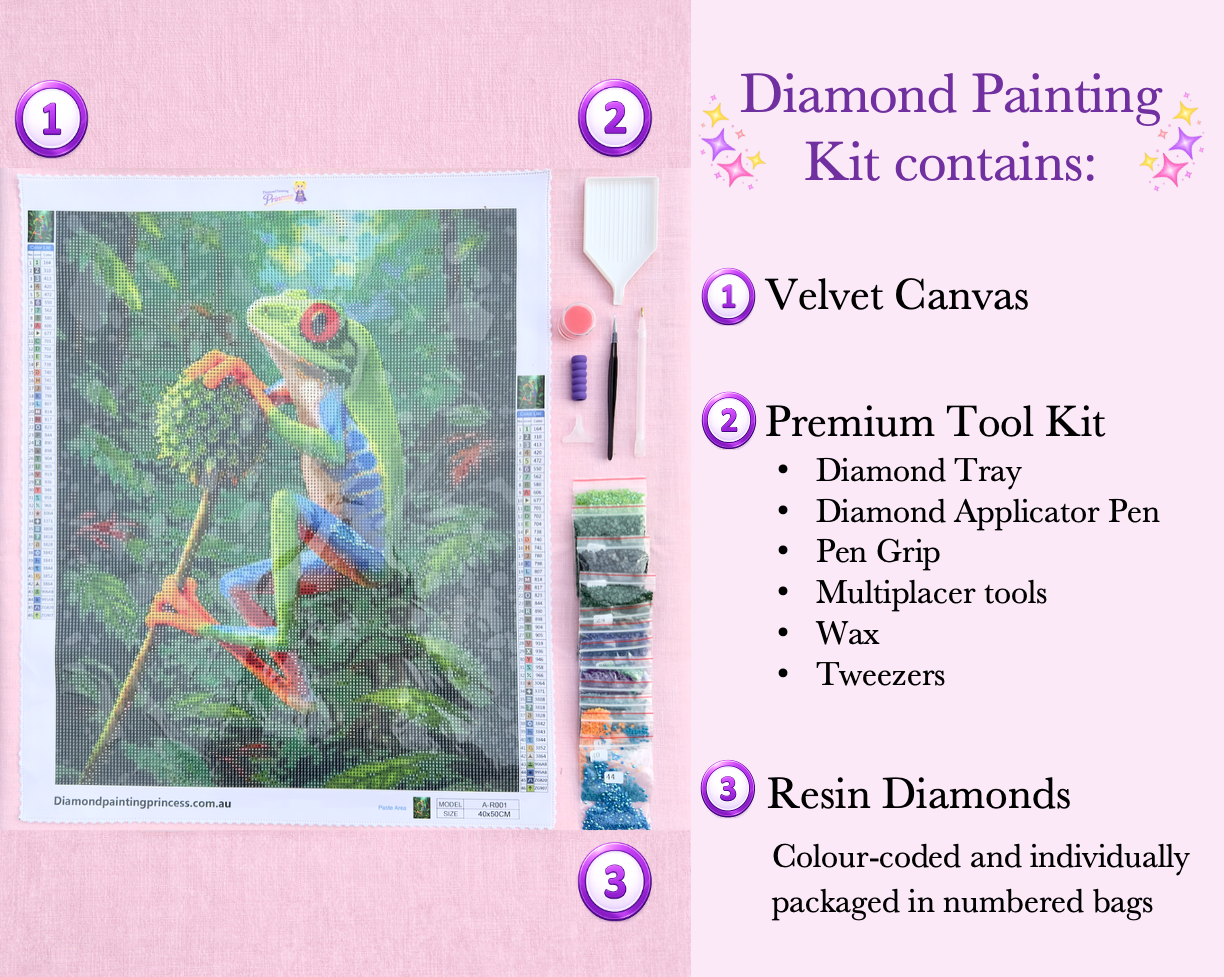
What’s in the Package

The kit contains everything you need to complete the diamond art project:
1. Printed adhesive canvas with symbols
2. Toolkit
Contains a tray, a diamond art pen with multiple attachments (for applying different numbers of diamonds), a pen grip, wax (for the pen), and tweezers.
3. Diamonds (Drills)
Round or square diamonds of all the colours required to complete the picture. Excess diamonds are provided in case of spillage. Each bag of diamonds is labelled with a number to identify that colour. This correlates with the list of colours required, which is printed on the side of the canvas.
How to Diamond Paint
Diamond painting is fun and easy. Here’s a step-by-step guide to get started.

Step 1: Set Up Your Workspace
Choose a clean, well-lit area with enough space to lay the canvas flat.
Tip: Good lighting is very helpful - If the ceiling lights aren’t adequate a lamp or light pad makes symbols easier to see, especially on darker canvases.

Step 2: Unroll and Flatten the Canvas
Lay the canvas flat and let it relax.
Tip: If it’s curled, place a couple of books on the corners. Over time it will naturally relax and become flat.

Step 3: Choose an area to start in
Many people choose to start in a corner, but of course you can start wherever you feel like. In that area look at what symbols are present and choose one to start with. Then refer to the symbol key on the side of the canvas which shows which symbol matches with each diamond colour. Find the diamond number that correlates to that symbol you wish to start with. Each bag of diamonds is labelled with a number that matches a number on the symbol key. Find the bag of diamonds with that number.
Tip: I like to start in the bottom right corner since I am right-handed. That means that when I’m applying the diamonds I don’t have to avoid putting my hand down on the sticky adhesive when I am applying each diamond.


Step 4: Pour Diamonds into the Tray
Pour a small amount of diamonds of the chosen colour into the tray. Gently shake the tray so the diamonds flip right-side up into neat rows.
Tip: Don’t put in too many diamonds or they will just become a big pile rather than aligning in neat rows.

Step 5: Peel Back the Film
The clear protective film keeps the glue clean. Peel back only a small section at a time (like 5–10 cm) so the rest stays protected. Try to avoid removing the whole cover at once since dust and lint will stick. Always reapply the film to the uncompleted canvas when not in use to avoid dust and lint attaching to the glue on the canvas.
Tip: Use an object (eg: phone) to hold back the film so it doesn’t flip back while you are applying dots.
Tip: If the glue gets lint on it, dab gently with a baby wipe (very lightly) and let dry. Avoid soaking the canvas.

Step 6: Load the Pen with Wax
Peel the wax film off, then press the pen tip into the wax a few times to load it with wax until it feels “grippy.” When the diamonds are starting to feel difficult to pick up then add a little more wax.
Tip: Too much wax can leave residue - use only as much as you need. Remove any pink wax you notice on the diamonds / canvas.

Step 7: Pick Up the Diamonds
Press the pen tip onto the top of a diamond. It should stick to the pen.
Tip: If you have an area with a lot of the same colour in blocks you can change the pen tip to pick up multiple diamonds at once. This is a multi-placer tip and they allow you to pick up 3-10 diamonds at once.

Step 8: Match the Symbol and Place the Diamond
Find the symbol on the canvas matching that diamond colour and gently place the diamond on that square/circle. Lightly press to secure it.
Tip: Don’t worry about perfection - diamonds can be nudged into place before you press firmly. You can use the diamond pen or tweezers to straighten or fix diamonds.

Step 9: Apply Diamonds to that Section
Complete that colour in the small uncovered section of canvas. From there the options are to peel back more canvas to continue with that colour or choose another colour found in that area and change to that.
Tip: Many people find it easiest to do one colour at a time in each section, but you can have diamonds of multiple colours in trays at once. Just make sure you keep track of which colour matches which symbol (eg: put the numbered bag next to the tray).

Step 10: Keep Diamonds Organised
As you switch colours, return remaining diamonds to their bag and seal tightly to avoid spillage.
Tip: Diamonds can be stored in their original bags, small zip-lock bags, or containers. Make sure the storage bag / container is clearly labelled with the diamond colour number.

Step 11: Fix any Mistakes (we all make them!)
If diamonds aren’t in a straight line then use the pen tip to push them into the correct places. If a diamond is placed in an incorrect spot then use fingers or tweezers to lift gently, then move it to the correct position, and press it down again.
Tip: If a diamond needs to be moved to the space next to it then you can gently push it across using the diamond pen rather than having to completely remove it from the canvas and reapplying.

Step 12: Finish and Press the Canvas
Occasionally when applying diamonds they don’t fully push down flat onto the canvas, often because they are a little too close to the diamond next to them. This can be difficult to see but over time these diamonds may fall off the picture due to lack of adhesion. In order to make sure all the diamonds are stuck down fully, when the project is finished, place the protective film or a clean sheet of baking paper over the canvas and gently press the diamonds down. Any loose ones should click into place.
Tip: Other options for pressing the diamonds down include using a rolling pin or a diamond art roller, or pressing down with a book.

Step 13: Seal (Optional)
Sealing helps lock diamonds in place - especially if your artwork will be handled often. This is an option but not essential since the glue on good quality canvases will generally hold the diamonds in place over the long term if the diamonds have been applied well with a good connection.
Tip: Sealer slightly reduces sparkle (some sealers more than others), so many people prefer not to seal and instead frame under glass.

Step 14: Frame or Display Your Artwork
Popular display options:
- Frame behind glass
- Stretch on canvas bars
- Poster hangers
- Portfolio folder
Tip: If you send us a photo of your completed Diamond Painting Princess art then we will display it on our “Share Your Art” page. We’d love to see your beautiful creations!
Reasons to do Diamond Painting
There are many reasons to try diamond painting – the first being that it’s simply wonderful!

Diamond painting transforms artwork into a sparkling, vibrant medium, adding depth, colour, and brilliance that elevates an image from something nice to look at into a piece worthy of display. The finished result is eye-catching, textured, and truly special.
It’s also a fantastic creative outlet for people who love art but may not feel confident drawing or painting. Diamond painting makes it possible for anyone to create beautiful artwork, regardless of artistic experience or natural ability.
As an added bonus, the process itself is incredibly relaxing. Placing each diamond is calming, helping to reduce stress and anxiety. Many people enjoy diamond painting while listening to music, audiobooks, or their favourite shows — unwinding as their artwork gradually comes to life.
Diamond painting can be a truly relaxing, enjoyable, and rewarding experience.